How to Use Custom Stinger Transitions in OBS
Learn how to set up custom stinger transitions in OBS to make your stream look pro, smooth, and seriously eye-catching. We’ll cover where to find them, how to add them, fine-tuning tips, and quick fixes for common stinger problems.

Let’s be honest, we’ve all watched a stream where the creator clicks to a new scene and it just… cuts. No flair. No sauce. Just a hard jump like your dad flipping through TV channels. If you want your stream to look polished, professional, and just... cooler, you need to implement stinger transitions.
Stinger transitions are those slick, full-screen animations that bridge the gap between scenes. They can explode, wipe, slide, or flash your logo across the screen, making your stream feel like it was produced by someone who knows what they’re doing (even if you're still streaming in pajama pants). They don't just look good, they hide awkward scene changes, mask loading hitches, and bring a level of production value that instantly makes your stream more watchable.
The good news? You don’t need a film degree to use them. That's why we're here. By the end of this post, you’ll know exactly how to set up custom stinger transitions in OBS, the right way, so your stream pops without you smashing your keyboard in frustration.
What is a Stinger Transition?
A stinger transition is a full-screen animation that plays when you switch between scenes in OBS. It’s like a visual handshake between your “Be Right Back” screen and your gameplay, or between your facecam and your game feed. Instead of just snapping to the next scene or using the default fade, a stinger swoops in, does its thing, and smoothly moves you to the next part of your stream.
Stingers usually rely on alpha transparency (meaning they can have see-through parts) or color keying (where a specific color is removed, like a green screen effect) to let the animation blend naturally with your scenes. Think of it like a quick, stylish curtain drop.
Example of a stinger - old NerdorDie Glitch Stinger
Real-World Stinger Examples:
- A fast logo wipe that slices across the screen as you transition.
- An explosion that completely covers the frame, then reveals the new scene.
- A spinning circle that fades out to unveil your gameplay.
These are the little touches that make your stream look like you know what you’re doing, even if you’re still figuring out why OBS occasionally scrambles your GPU.
Where to Find or How to Create Stinger Transitions
You’ve got two solid paths here: grab a pre-made stinger or make your own. Let’s break them down.
Option 1: Free or Paid Stingers (The Fast Lane)
If you want to get straight to the action without diving into animation software, there are tons of stream resource sites offering ready-to-go stingers:
- Nerd or Die – High-quality free and premium stingers with tons of style packs.
- OWN3D – Massive library of overlays, alerts, and slick stingers.
- Visuals by Impulse – Freebies and custom design options if you want something totally unique.
- Streamish - soon™
You can usually find free packs or pay a little for stingers that look like you spent way more than you actually did.
Option 2: DIY Stingers (The Creative Route)
If you want full control or just like making cool stuff, creating your own stinger is totally doable.
Software You Can Use:
- After Effects – The go-to for professional stingers. Tons of tutorials, but also a learning curve.
- DaVinci Resolve – Free, powerful, and less terrifying than After Effects.
- Canva – Yep, Canva. Basic animations, simple exports, and perfect for low-key stingers if you’re not ready to live inside Adobe.
Quick DIY Workflow:
- Animate your stinger – Think logo spins, wipes, or simple fades.
- Export with transparency – Must support alpha channels (MOV or WebM with transparency). No cheating.
- Convert to WebM – OBS loves it, your CPU loves it, your viewers love it. Use free converters like Shutter Encoder or online tools.
Making your own stinger is a great option. You get something totally you, and it’s another excuse to procrastinate by fiddling with animations for three hours instead of actually streaming.
Requirements for Custom Stingers
Before you start tossing fancy animations into OBS like you’re running a network TV studio, let’s cover what your custom stinger actually needs to work smoothly.
1. File Types:
You’ve got two main choices here:
- MOV files with an alpha channel (that’s what gives them transparent backgrounds).
- WebM files, which OBS absolutely loves. They’re smaller, load faster, and keep your stream from chugging like an overheating lawnmower.
If you can, go WebM. It’s lightweight, clean, and plays nice with OBS. MOV files can work but tend to be beefy and occasionally cause stutters.
2. Frame Rate:
Your stinger’s frame rate should match your stream’s frame rate.
If you’re streaming at 60 FPS, your stinger should be 60 FPS.
If you’re streaming at 30 FPS, your stinger should be 30 FPS.
Mismatched frame rates can make your stinger look jittery or weirdly choppy.
3. Duration:
Keep your stinger between 1 to 3 seconds.
Longer than that? It starts to drag and kill the pacing.
Shorter than that? It feels like a visual hiccup instead of a proper transition.
Find that sweet spot where it’s noticeable but not a whole mini-movie.
How to Add a Stinger Transition in OBS (Step-by-Step)
Alright, you’ve got your shiny new stinger. Now let’s actually get it into OBS without rage-quitting.
Step 1: Open OBS
Yeah, obviously. But seriously, make sure you’re working in the right OBS profile and scene collection if you have multiple setups.
Step 2: Add a Stinger
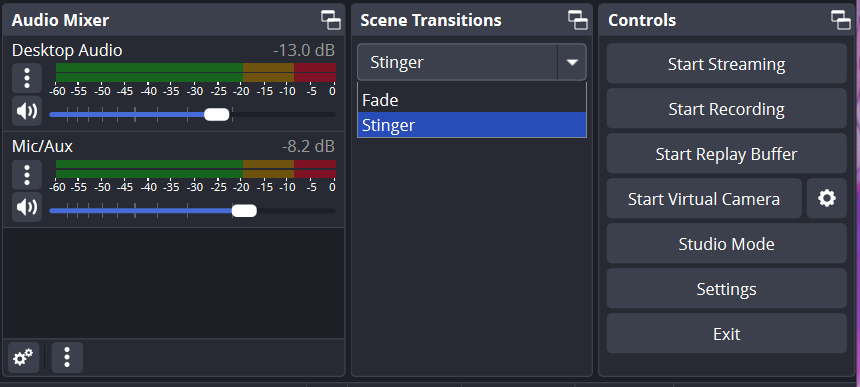
In OBS, go to the Scene Transitions dock (bottom-right by default) and click the "+" button.
Select Stinger.
Step 3: Name Your Transition
Call it something you’ll actually recognize later.
Not "transition_023_final_v2" ...
Try something like "Main Stinger" or "Logo Wipe". Something that makes sense when you’re panicking mid-stream.
Step 4: Load Your Stinger File
Click Browse and find your stinger file (WebM or MOV).
Load it up and get ready for the fun part.
Step 5: Set the Transition Point (ms)
This is the magic number; the moment in milliseconds when OBS should switch scenes.
If you set it too early, you’ll get a jumpy transition.
Set it too late, and it’ll feel sluggish and out of sync.
Play your stinger file and watch carefully for the frame when the screen is completely covered by the animation. That’s your sweet spot.
Set the transition point to match that frame in milliseconds.
If you want to get nerdy, you can use free video players like VLC that show frame-by-frame timestamps to dial it in.
Step 6: Preview and Tweak
Hit the little “Transition” preview button to test it.
Adjust the transition point as needed until it feels clean and tight.
This is the part where you can obsess for 15 minutes because it’s just off by one frame. You’ll know it when it’s right.
Step 7: (Optional) Add a Sound Effect
In the stinger settings, you can load a sound file (think whoosh, swoosh, pop) and even adjust if the audio comes from the old scene or the new scene.
Make sure the sound lines up perfectly with the moment the scene switches. When it snaps into place? Oh, it’s satisfying.
Step 8: Finalize It
Click OK and select your new stinger as your active transition.
Boom. You’re officially leveling up.
Your custom stinger is now locked, loaded, and ready to fire like you’ve been streaming professionally for years.
Fine-Tuning Like a Pro
You’ve got your stinger loaded and working, but now it’s time to dial it in like a boss. Here’s how to tweak it so your transitions feel silky-smooth instead of awkward or clunky.
Adjust Transition Speed
If your stinger feels sluggish, like it’s taking its sweet time strolling across the screen, you can speed up the animation by trimming the source file or creating a faster version.
If it feels twitchy or too frantic, slow it down a bit to give your scene switch some breathing room.
Small timing tweaks make a big difference. A transition that’s perfect for your BRB screen might feel rushed when switching between gameplay scenes.
Use Hotkeys for Manual Stingers
Want to manually trigger stingers instead of automatically switching scenes?
Set up hotkeys in OBS to launch transitions on command. This is awesome for:
- Surprise scene changes.
- Dramatic camera cuts.
- Manual replay moments.
It gives you more control and can seriously amp up your stream’s pacing.
You can find the hotkey settings under Settings > Hotkeys > Transition (Set). Just assign keys you won’t accidentally hit when you’re furiously spamming your WASD keys.
Keep multiple stingers ready to go.
- One for hype moments (think: loud, energetic, fast).
- One for chill scenes (something smooth and low-key).
- One for disaster recovery, because nothing’s funnier than a comedic stinger when your stream crashes or you accidentally show your desktop.
Having a stash of stingers gives your stream variety and gives you more ways to keep your audience hooked.
Test your stinger on different scene combos.
Just because your stinger looks perfect switching from your webcam to your game doesn’t mean it’ll feel right jumping from a game scene to a BRB screen.
- Sometimes the speed needs adjusting.
- Sometimes the transition point needs a tiny shift.
- Sometimes the vibe just doesn’t hit the same.
Don’t assume one-size-fits-all. Test it and tweak it.
Your transitions should feel like they belong on your stream; not some random thing you added because a blog post told you to.
Troubleshooting Common Stinger Problems
Even when you’ve got your stinger set up, sometimes OBS just likes to remind you who’s boss. If things aren’t running buttery smooth, here’s how to fix the most common stinger headaches without throwing your PC out the window.
Problem: Stinger Lags or Doesn’t Play Smoothly
If your stinger looks like it’s moving through molasses, don’t panic, this is usually a file or system load issue.
Solution:
- Lower the file size.
Big, uncompressed files are too much. - Use WebM files.
Seriously, WebM is amazing for OBS. Smaller, smoother, better. - Check your CPU load.
If your system’s maxing out, OBS will absolutely start dropping frames. Close background apps and lower scene complexity.
Problem: Audio Desync
The stinger animation plays, but the sound is either too early or awkwardly late, making your transition feel like a badly dubbed movie.
Solution:
- Re-time your transition point.
Sometimes your audio is fine, you just set the scene switch too early or too late. - Adjust the audio offset in the stinger settings in OBS to line things up perfectly.
Pro Tip: Preview it a few times to make sure it syncs across all your scenes, not just one.
Problem: Wrong Transition Point
If the scene switch happens too soon or too late inside the animation, your stinger’s rhythm gets totally thrown off.
Solution:
- Slow down the stinger in your video editor so you can stretch out the moment and adjust more precisely.
- Re-export the stinger and (if you’re smart) add visual markers, like a solid color frame or a temporary flash, to help you identify the exact frame where the switch should happen.
The goal is to get the transition point dialed in so tight that it feels like the animation and the scene change were born to be together.
Let’s wrap this up:
Stingers = polish, pace, personality.
Stingers are not just flashy animations, they make your stream flow better, look sharper, and feel like you actually planned things out.
Don’t settle for the default fade.
Try different stingers, mix up the styles, and find what fits your stream’s vibe. The more you experiment, the more your stream will stand out.
Now go out there and make those scene changes pop like you know what you’re doing.