The Ultimate OBS Studio Settings Guide (with Examples)
Unlock the secrets to crisp, professional streams with our ultimate OBS Studio settings guide. From video and audio basics to pro tips and real-world setups, you’ll find everything you need to level up your live broadcasts... no tech degree required.


You’re here because you want to make your streams look legit. You want to look pro, not like you’re broadcasting live from your grandma’s basement using a potato webcam. (Unless you are streaming from your grandma’s basement. In that case, tell her we said hi.)
Let’s be real: OBS Studio is the gold standard for live streaming, whether you’re aiming for Twitch stardom, YouTube glory, or just want your Discord friends to see you crush at GeoGuessr in glorious HD. But there’s a catch. OBS comes packed with buttons, sliders, and settings that can turn your first stream into a blurry, laggy, pixelated mess if you don’t set things up right.
That’s where this guide comes in. We’re about to walk you through the ultimate OBS Studio settings... what each thing means, what to actually click, and most importantly, how to make sure you don’t end up as a cautionary tale in some streamer fail compilation.
Whether you’re a total beginner who’s never touched OBS or you’re an aspiring pro tired of troubleshooting stuttering streams, you’re in the right place. No tech degree required. Just a willingness to learn, a sense of humor, and maybe a backup beverage for when things get weird.

Let’s dive in and get your stream looking sharp.
First Things First – What Is OBS Studio?
OBS Studio in One Sentence
OBS Studio is the free, open-source Swiss Army knife for live streaming and recording, trusted by everyone from absolute newbies to full-time pros, because it actually works (and won’t drain your wallet).
Quick Install Walkthrough
Ready to join the club? Head to obsproject.com and grab the download for your operating system: Windows, Mac, or Linux. No sketchy sites, no 27 pop-up ads.
- Download the installer.
- Double-click.
- Mash “Next” until you see “Install.”
- Grab a beverage while it installs (optional, but recommended).
- Click “Finish.” You did it!
If you’ve ever installed anything on your computer before, you’re already qualified. If you haven’t, wut?
OBS Basics You Should Actually Care About
The OBS Interface Tour (Without the Fluff)
When you first open OBS, you’ll see a bunch of panels. Don’t worry. Most of them are just there to look intimidating. Here are the only parts you really need to care about right now:
- Preview Window:
This is what your audience will see. If it looks weird here, it’ll look weird on stream. - Scenes Panel (bottom left):
Think of scenes as “pages” in your stream. You might have a “Just Chatting” scene, a “Game” scene, or a “Be Right Back” scene.

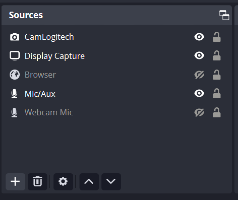
- Sources Panel (next to Scenes):
Sources are the ingredients for each scene, aka your webcam, your game, images, alerts, etc.
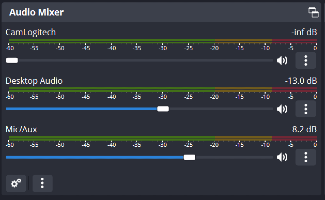
- Audio Mixer:
Watch the bars bounce. If your mic bar isn’t moving when you talk, Houston, we have a problem.
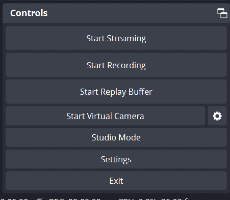
- Controls (bottom right):
Where the magic happens: Start Streaming, Start Recording, Settings, and Exit (don’t click Exit unless you mean it).
That’s it! Ignore the rest for now. If you accidentally click something you don’t recognize, don’t panic. Nothing here will self-destruct.
Scenes vs. Sources – Don’t Get Them Twisted
Here’s the difference, plain and simple:
- Scene: The big container. Think of it as a TV channel or a page in your streaming “show.”
- Source: The stuff you put inside. Webcam, game capture, images, text. Each is a source.
Analogy Time:
If your stream was a sandwich, the scene is the bread, and the sources are the fillings. You need both, or you’re just staring at an empty plate.
Example: Setting Up a Simple “Just Chatting” Scene
Let’s do this together.
- Make a New Scene:
- In the Scenes panel, hit the + button and name it “Just Chatting.”
- Add Your Webcam (Source):
- Click the + in the Sources panel, choose “Video Capture Device.”
- Pick your webcam, hit OK.
- Resize and move your webcam in the Preview window so you’re not just a mysterious forehead.
- Add Your Mic (Source):
- OBS usually detects your default mic automatically. If not, hit the + again in Sources and add “Audio Input Capture.”
- Select your mic.
- Add a Simple Background (Optional, but makes you look fancy):
- Hit + in Sources, choose “Image.”
- Pick a chill background, drag it below your webcam in the Sources list so you’re not hidden behind it.
- Test Your Scene:
- Look at the Preview. Does it look like you’re ready to chat, or like you just woke up? Adjust as needed.
Congrats! You just made your first scene. See? Not scary at all. Next stop: looking like a pro, even if you’re still in your pajamas.
Video Settings – Making Sure You Don’t Look Like a Pixelated Potato
If your video looks like someone tried to stream through a frosted window, don’t worry. It’s almost always fixable.
OBS gives you power over two things that determine how sharp and smooth your stream looks: resolution and frame rate (FPS). Let’s break these down, minus the confusion.
Resolution: Base (Canvas) vs. Output (Scaled)
Open OBS and head to Settings > Video. You’ll see two options for resolution:
- Base (Canvas) Resolution:
This is your “working area”, the size of the screen you’re building your stream on. Usually, set this to match your monitor (like 1920x1080 for most people). - Output (Scaled) Resolution:
This is what your viewers will actually see. You can shrink this to help your stream run smoother or to fit your internet speed.
Translation:
If your Base is 1920x1080, but Output is set to 1280x720, you’re building your scene in Full HD but sending it out as 720p. Looks decent, but easier on your computer and internet.
Example: Why 1080p Isn’t Always the Best
Everybody wants to say they’re streaming in 1080p, right? But here’s the catch:
- 1080p needs a lot of bandwidth. If your upload speed isn’t up to snuff, your stream will stutter, buffer, and make you look like a Minecraft character.
- 720p is still totally fine. Most viewers on phones or small screens won’t even notice the difference.
- What to do: If you’re just starting out or your internet is average, set Output (Scaled) Resolution to 1280x720. You’ll look crisp without putting your computer on life support.
FPS: Smoothness vs. Melting Your PC
FPS stands for frames per second. Higher numbers mean smoother video, but also mean more work for your computer.
- 30 FPS: The safe, reliable, classic. Good for talking, casual games, and when you want your PC fans to stop screaming at you.
- 60 FPS: Super smooth, great for fast-paced games but your computer and upload speed both have to keep up.
Example: 30 vs. 60 FPS Side-by-Side
- 30 FPS: You’ll look like a standard YouTuber or Zoom call, perfectly watchable.
- 60 FPS: Movements look buttery smooth, but only go for this if your hardware and upload speed can handle it. Otherwise, expect dropped frames and choppiness.
Pro Tip:
If your test streams are choppy at 60 FPS, drop to 30 FPS. Your viewers will thank you (and so will your CPU).
Common Mistakes (and How to Avoid Them)
- Trying to stream 1080p60 on a budget laptop: Not gonna happen. Dial it back to 720p30 for smoother results.
- Ignoring your upload speed: Use speedtest.net before every stream. Aim for at least 5 Mbps upload for 720p30.
- Mismatch between Base and Output Resolution: Keep Base and Output matched unless you know why you’re changing them.
- Overcomplicating things: Start simple. You can always raise your settings later.
Bottom line:
Your stream should look smooth and sharp, but it’s way better to be reliable at 720p30 than to drop frames trying to impress with “pro” settings. The less you look like a pixelated potato, the more your viewers will stick around.
Audio Settings – You Want People to Hear You, Right?
Let’s be honest: If your stream looks amazing but your audio sounds like you’re yelling through a sock, people are going to click away faster than you can say “mic check.”
Good news: OBS makes it easy to get your sound right, even if you have a noisy room, a budget mic, or a PC fan that sounds like a lawnmower.
Mic Setup: Filters and Noise Suppression Basics
First, let’s get your mic sounding clean and clear.
- Add Your Mic:
In the Audio Mixer panel, look for your mic. If you don’t see it, click the gear icon and go to Properties to select your microphone. - Add Filters:
Click the gear icon next to your mic, choose Filters. Now you can add:- Noise Suppression: Cuts out that constant hum or fan noise in the background.
- Noise Gate: Mutes your mic when you’re not speaking, so your viewers don’t hear every cough, keyboard tap, or mysterious house noise.
- Compressor: Keeps your voice at a consistent level (no more volume jumps when you get excited).
Example: How to Remove That Annoying Fan Noise
- Go to your mic in the Audio Mixer, hit the gear, choose Filters.
- Click the + icon, add Noise Suppression.
- Pick “RNNoise” if you have a modern computer it’s more effective than the default “Speex” option.
- Test it: Speak, and then stay quiet. Listen for that fan noise. If it’s gone, congrats! You’ve just leveled up your audio game.
Desktop Audio: Balancing Game and Mic Levels
You want your viewers to hear both your game and your glorious commentary, but not have to choose between blasting their speakers to hear you or going deaf from the game.
- In the Audio Mixer, you’ll see separate sliders for Desktop Audio (what you hear: game, music, alerts) and Mic/Aux (your voice).
- Test and Balance:
- Do a quick local recording (click “Start Recording” instead of “Start Streaming”).
- Play your game and talk as you would during a stream.
- Play back the recording. If your voice is too quiet or the game is too loud, adjust the sliders.
- Aim for:
- Your voice peaking between -10 and -5 dB.
- Game audio should never drown you out.
Monitoring and Advanced Tips
Want to get really pro? Here’s how:
- Audio Monitoring:
Go to Edit > Advanced Audio Properties.- Here, you can set your mic or desktop audio to “Monitor and Output.” This lets you hear yourself in your headphones, helpful, but can be distracting so use wisely.
- Multiple Audio Tracks:
Planning to upload to YouTube later? You can record your mic and game audio on separate tracks for easy editing. Set this up under Settings > Output > Recording. - Limiter Filter:
If you get loud (who doesn’t when they get a victory royale?), add a Limiter filter to your mic. This prevents ear-shattering peaks.
Bottom line:
Take five minutes to tune your audio and your viewers will notice. Good sound = pro streamer vibes. Bad sound = “Nice try, next channel.” Up next: Output settings that won’t make your stream explode.
Output Settings: Don’t Let Bitrate Be Your Enemy
The Output section in OBS is where streams live or die. If you’ve ever wondered why your stream is choppy, blurry, or sounds like a robot underwater, odds are it’s all about bitrate or encoder settings. Here’s how to get it right:
Streaming Tab vs. Recording Tab: Don’t Mix These Up
Go to Settings > Output. You’ll see two tabs:
- Streaming: These settings control what goes live to Twitch, YouTube, or wherever you stream.
- Recording: These are for when you want a local copy on your PC, maybe for making highlight reels or YouTube uploads.
Don’t mix them up!
If you set your streaming bitrate super high, but your internet can’t handle it, say hello to buffering city. If you set your recording bitrate super low, you’ll end up with a blurry mess you can’t fix later. Set each one for its purpose.
Bitrate Explained Like You’re Five
Bitrate is how much data you send per second.
- Higher bitrate = prettier video, but you need more upload speed.
- Lower bitrate = easier on your internet, but your video starts looking like abstract art.
Imagine pouring water through a straw:
- Big straw (high bitrate, fast internet): Water flows fast, looks great.
- Tiny straw (low bitrate, slow internet): Water trickles out, everything’s choppy.
Example: “What Bitrate for Twitch? YouTube? My Neighbor’s Garage?”
Here’s a simple chart:
| Platform | 720p @ 30fps | 720p @ 60fps | 1080p @ 30fps | 1080p @ 60fps |
|---|---|---|---|---|
| Twitch | 2500-4000 | 3500-5000 | 4000-6000 | 6000* |
| YouTube | 2500-5000 | 3500-6000 | 4500-8000 | 6000-9000 |
| Neighbor’s Garage | Ask before you plug in |
*(Twitch has a hard cap of 6000 kbps for non-partners.)
If your upload speed is less than these numbers (run speedtest.net), lower your bitrate until streaming is stable.
Encoder Options: Software (x264) vs. Hardware (NVENC/AMD/VCE)
Encoder = The muscle that turns your video into something you can stream.
- Software (x264):
Uses your CPU to do the heavy lifting. Good if you have a strong processor and aren’t gaming on the same PC. - Hardware (NVENC/AMD/VCE):
Uses your graphics card (GPU). Most modern NVIDIA and AMD cards have built-in encoders that are surprisingly good. Lets your CPU breathe.
Example Scenarios: Potato PC vs. Beastly Rig
- Potato PC (budget laptop/old desktop):
- Go with hardware encoding (NVENC/AMD/VCE) if your GPU supports it.
- Stream at 720p30, 2500-3000 bitrate.
- Beastly Rig (gaming PC with modern GPU):
- Use NVENC (on NVIDIA) for great results while gaming and streaming.
- 1080p60 at 6000 bitrate (if your upload speed allows).
If your stream lags or your PC feels hot enough to fry an egg, switch encoders or lower your settings.
Recording Formats and Quality Presets
Recording tab in Output settings:
- Recording Format:
- Use mp4 or mkv (mkv is safer, OBS won’t corrupt your whole file if OBS crashes, but you can convert mkv to mp4 later).
- Audio Tracks:
- You can record separate audio tracks (great for editing).
- Quality Presets:
- “High Quality, Medium File Size” is a good start.
- “Indistinguishable Quality, Large File Size” if you have disk space to burn.
Internet and Bandwidth – Because Buffering is the Worst
Let’s be honest: All the pro OBS settings in the world mean nothing if your internet is slower than a line at the DMV. Nothing kills a stream faster than endless buffering or your webcam turning into a slideshow.
Upload Speed: Test It Before You Embarrass Yourself
First rule of streaming club: Know your upload speed. Not your download speed.
- Go to speedtest.net. Click “Go.”
- Look at “Upload” (not “Download”).
- That number (measured in Mbps) is the lifeblood of your stream.
Rule of Thumb:
Your streaming bitrate should be no more than 75% of your actual upload speed.
Example: If your upload is 6 Mbps, max out at 4,500 kbps bitrate.
Why? Leave room for overhead, game updates, or the roommate streaming “8K dog videos” in the other room.
Recommended Settings for Different Speeds
Here’s a quick breakdown:
- Upload: 3 Mbps
- 720p, 30fps, 2,000-2,500 bitrate
- Medium quality, but won’t choke your connection
- Upload: 5 Mbps
- 720p, 60fps or 1080p, 30fps, 3,500-4,500 bitrate
- Decent quality for most streams
- Upload: 10+ Mbps
- 1080p, 60fps, 6,000+ bitrate
- You’ve entered the promised land. Go wild (just not past Twitch’s cap)
If you’re under 3 Mbps:
- Lower your resolution and FPS until your stream is smooth.
- Or consider recording locally and uploading videos later.
Example: “Can I Stream with McDonald’s Wi-Fi?”
Let’s address the fries in the room:
Technically, yes. Should you? Absolutely not.
- Most public Wi-Fi (coffee shops, McDonald’s, airports) is barely enough for email, let alone live streaming.
- Public Wi-Fi is usually capped, crowded, and about as reliable as a weather forecast from 1993.
- Even if you manage to go live, expect sudden disconnects, buffering, and a stream that looks like it was filmed with a potato.
Advanced Tweaks (Optional, But Cool)
Want to add a little sizzle to your streams? Or just make your life a whole lot easier? OBS is packed with pro-level features that sound intimidating, but are actually pretty simple once you know where to click.
Here are a few power-ups you should absolutely try:
Hotkeys for Everything
Nobody wants to fumble around with the mouse in the middle of a stream (“Wait, which scene is it again?!”).
Hotkeys let you control your entire stream with the tap of a button like a pro DJ.
- Go to Settings > Hotkeys
- Assign keys for anything: switching scenes, muting your mic, starting/stopping stream, even showing that “Be Right Back” screen when the pizza delivery arrives.
- Pro Tip: Use keys you won’t accidentally hit during gameplay (so maybe not the spacebar). Or pick up something like this to keep it truly separate.
Once you use hotkeys, you’ll wonder how you ever streamed without them.
Setting Up Scenes for Stream Transitions
Stream transitions are those fancy fades, slides, or stingers that make your stream look polished instead of amateur hour.
Here’s how to set it up:
- Create Multiple Scenes:
- Example: “Game,” “Just Chatting,” “BRB.”
- Go to Scene Transitions Panel:
- Bottom-center of the OBS window.
- Choose from built-in transitions (Fade, Cut) or add your own custom stinger (short animation).
- Assign Transitions to Specific Scenes:
- Advanced: Right-click the transition, choose “Transition Override.”
Transitions keep your stream looking seamless, even when you’re moving from “gameplay” to “face cam” to “I forgot to feed my cat.”
Studio Mode: What Is It
Studio Mode sounds intimidating, but it’s your secret weapon for professional streams.
- Click the Studio Mode button (bottom right).
- OBS splits into two previews:
- Left: “Preview” (what you’re working on)
- Right: “Program” (what your viewers see)
- Make changes, line up your scenes, fix a typo, all without your viewers seeing a thing.
- When you’re ready, hit “Transition” to push your changes live.
No more on-stream “oops” moments when you move something by accident.
Useful Plugins
Plugins are like cheat codes for OBS, unlocking features you didn’t even know you wanted. Some must-try favorites:
- OBS WebSocket: Control OBS from your phone or Stream Deck.
- Move Transition: Animate your sources and scenes.
- OBS Shaderfilter: Add real-time effects to your video.
- Closed Captioning: Make your streams more accessible.
Want more? Check out our Streamish OBS Plugin Roundup for full reviews, install guides, and how to not break your setup in the process.
Troubleshooting – What To Do When Things Go Sideways
No matter how slick your setup is, every streamer has that “Why is everything on fire?” moment. OBS is powerful, but it can also be a little moody. The good news: most problems are fixable with a few quick checks. Here’s how to put out the most common fires before you turn into a viral fail clip.
Common OBS Errors and Fixes
1. Black Screen (Game or Window Capture):
- Double-check you’ve selected the right source and window.
- On laptops, try running OBS as administrator.
- For laptops with dual graphics, make sure OBS is using the same GPU as your game (Google your specific model for steps).
2. No Audio in Stream/Recording:
- Make sure the right mic and desktop audio devices are set in Settings > Audio.
- Check the Audio Mixer sliders aren’t muted or turned all the way down.
- Still nothing? Restart OBS. (It’s the “turn it off and on again” fix for a reason.)
3. “Encoding Overloaded!” Error:
- Your PC can’t keep up with your current settings.
- Lower your Output (Scaled) Resolution and/or FPS.
- Try switching from software (x264) to hardware encoding (NVENC/AMD).
Dropped Frames: Why It Happens and What to Try
Dropped frames mean parts of your stream are lost before they even reach your viewers. You’ll notice choppiness, freezing, or the infamous buffering wheel.
Why does this happen?
- Your upload speed can’t keep up with your bitrate.
- Your network is unstable (Wi-Fi gremlins, roommate streaming movies, etc.).
- Your computer is struggling with too high settings.
How to fix it:
- Run a speedtest before streaming. Lower your bitrate if needed.
- Use a wired Ethernet connection whenever possible. Wi-Fi is for cat videos, not serious streaming.
- Close other programs using bandwidth (sorry, no simultaneous Netflix binge).
- In OBS, go to Settings > Advanced and set “Process Priority” to “Above Normal.”
“Help, My Audio/Video Is Out of Sync!”
There’s nothing more distracting than when your lips move a full second before your words come out.
What causes this?
- High system load or using filters that delay audio.
- Using capture cards or external cameras that have processing delays.
How to fix it:
- In the Audio Mixer, click the gear next to your mic, choose Advanced Audio Properties.
- Use the Sync Offset field to add or subtract milliseconds until your audio matches your video. (Tip: Start with small increments, like 100ms.)
- Test by recording a quick video and clapping. Sync should look and sound right.
Bottom line:
Streaming problems happen to everyone, even the big names. Keep calm, work the checklist, and you’ll be back on air in no time. And remember, nobody ever went viral for having a perfectly smooth stream… but you can avoid the classic pitfalls.
Stream Like a Pro – Real-World Example Setups
There’s no single “perfect” OBS setup. It all depends on your gear, your bandwidth, and sometimes, how much your cat is willing to cooperate. Here are three real-world examples:
Example #1: The Budget Laptop Streamer
Scenario:
You’ve got an older laptop, a basic webcam, and you want to get started without your computer sounding like a jet engine.
Settings:
- Resolution: 1280x720 (both Base and Output)
- FPS: 30
- Encoder: Hardware (NVENC or AMD VCE) if available; otherwise, x264 with “veryfast” preset
- Bitrate: 2000-2500 kbps (check upload speed first!)
- Audio: Basic mic with noise suppression filter
- Scenes: Simple: one for chatting, one for screen/game capture
Pro Tip:
Keep it simple. Fewer sources, fewer problems. If you want overlays, use lightweight, static images.
Example #2: The Gamer with One Monitor
Scenario:
You’re gaming and streaming on a single monitor, no fancy dual setup yet. You need to keep things easy to manage.
Settings:
- Resolution: 1920x1080 (Base), 1280x720 (Output) for performance
- FPS: 60 if your PC can handle it, otherwise 30
- Encoder: NVENC (NVIDIA GPU) or x264 “faster” preset
- Bitrate: 3500-5000 kbps (based on upload speed)
- Audio: Game and mic balanced in the mixer, add a limiter filter to avoid ear-splitting yells
- Scenes:
- “Game” (game capture + webcam overlay)
- “Just Chatting” (full webcam)
- “BRB” (static image or text)
- Hotkeys: Set up scene-switching keys so you don’t have to alt-tab
Pro Tip:
Use the OBS “Dock” feature to pop out your chat, so you can see it without losing your game.
Example #3: The Dual-PC Streaming Maniac
Scenario:
You’re living the streamer dream: one PC for gaming, one dedicated to streaming.
(Or, you just like to tinker.)
Settings (Streaming PC):
- Resolution: 1920x1080 (both Base and Output)
- FPS: 60
- Encoder: NVENC (modern NVIDIA GPU) or x264 “medium” preset (if CPU is beefy)
- Bitrate: 6000 kbps (Twitch cap) or higher for YouTube
- Audio:
- Use an audio interface or virtual cable to send your mic/game audio cleanly between PCs
- Separate tracks for mic, game, Discord, etc.
- Scenes:
- “Game” (capture card input + webcam)
- “Chatting” (webcam + alerts)
- Custom stinger transitions between scenes
- Plugins: Consider plugins like Move Transition, OBS WebSocket for Stream Deck
Test your audio/video sync between the two PCs. It can get tricky!
Bottom line:
Whether you’re streaming from a laptop, juggling a game and chat on one screen, or living the two-PC dream, there’s a setup that works for you. Copy these templates, tweak them to your liking, and you’ll be streaming like a pro in no time.
You made it through the settings! Setting up OBS Studio isn’t always smooth, but now you’ve got the essentials (and a few pro tricks) in your toolkit.
Remember: It’s not about getting your settings absolutely perfect; it’s about not rage-quitting when something goes sideways. Every great streamer started by making a few mistakes and learning what works for their setup. If you can handle a dropped frame or two without flipping a table, you’re already ahead of the game.
Got questions, tips, or your own favorite OBS settings? Drop them in the comments below. Streamish is all about helping each other level up, and there’s always another trick to learn.